Essential Guide to Machine Embroidery Stitch Types

Machine embroidery has opened a world of creativity and efficiency for hobbyists and professionals alike. Central to creating beautiful embroidery designs is understanding the variety of machine embroidery stitch types, each offering unique textures and functionality. Mastering these stitch types empowers you to elevate your designs, whether you’re creating logos, intricate patterns, or decorative elements.
This guide explores the essential and advanced machine embroidery stitches, their benefits, and how to optimize and combine them for extraordinary results.
Understanding Machine Embroidery Stitch Types
Machine embroidery stitch types are the foundation of professional-quality embroidery. They determine the texture, depth, and overall aesthetic of the design. Whether you’re new to embroidery or looking to refine your skills, understanding the key stitch types will transform the quality of your work.
Understanding these stitch types is also crucial for successful embroidery digitizing, ensuring that each design element is accurately represented in the final product.
There are two main categories of stitches to consider:
-
Basic Stitches for foundational designs.
-
Advanced Stitches for complexity and durability.
By knowing how and when to utilize these stitch types, you’ll achieve stunning results across a variety of projects.
What are Machine Embroidery Stitch Types?
Machine embroidery stitch types refer to the various techniques used to create designs on fabric using an embroidery machine. These stitch types are the building blocks of machine embroidery, enabling the creation of a wide range of designs, from simple outlines to intricate patterns. Each stitch type offers unique textures and effects, making it essential to understand their applications and benefits.
Understanding machine embroidery stitch types is crucial for creating high-quality embroidery designs. It allows embroiderers to select the appropriate stitch for each part of their design, ensuring the final product is both visually appealing and durable. Additionally, knowledge of these stitch types aids in troubleshooting common issues, such as thread breakage or fabric puckering, that may arise during the embroidery process.
Whether you’re working on a delicate monogram or a bold logo, mastering the different machine embroidery stitches will elevate your work and expand your creative possibilities. From the foundational running stitch to the versatile fill stitch, each type plays a vital role in bringing your embroidery designs to life.
Basic Machine Embroidery Stitch Types
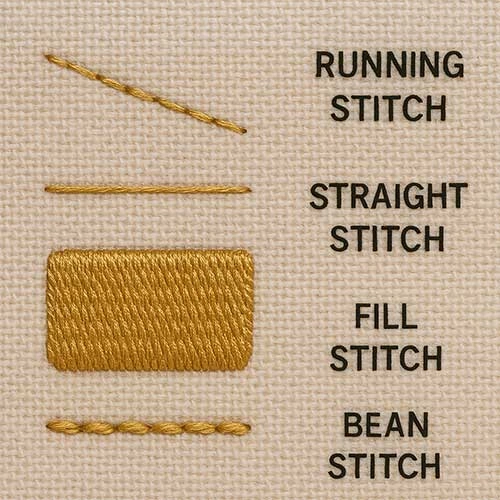
Running Stitch
Simple yet versatile, the running stitch, also known as the run stitch, is used for outlining motifs and adding linear details.
-
Key Features:
-
Works well for both short and long stitch lines.
-
Ideal for creating outlines or adding fine details to a design.
-
Best For:
Beginners starting their embroidery projects, or those stitching borders and delicate accents.
Straight Stitch
The straight stitch is fundamental to embroidery, offering clean and bold lines. The embroidery needle moves through the fabric to form continuous lines of stitching, essential for creating clean and bold lines.
-
Key Features:
-
Achieved by repeating a straight line of stitches.
-
Commonly used in logos, lettering, and monograms.
-
Best For:
Projects that require strong visual impact and precision.
Fill Stitch
Love adding texture to your embroidery design? The fill stitch is your go-to.
-
Key Features:
-
Covers larger areas with alternating stitches for a smooth, filled look.
-
Perfect for shading and giving designs dimension.
-
Best For:
Intricate patterns or areas with dense, textured designs.
Bean Stitch
The bean stitch offers enhanced durability and boldness by stitching back and forth between two points. Unlike run stitches, which create evenly spaced lines, the bean stitch offers enhanced durability and boldness by stitching back and forth between two points.
-
Key Features:
-
Creates a thicker, denser look compared to the running stitch.
-
Requires fewer stitches than the satin stitch for similar impact.
-
Best For:
Outlining designs or creating bold emphasis within embroidery patterns.
Advanced Machine Embroidery Stitch Types
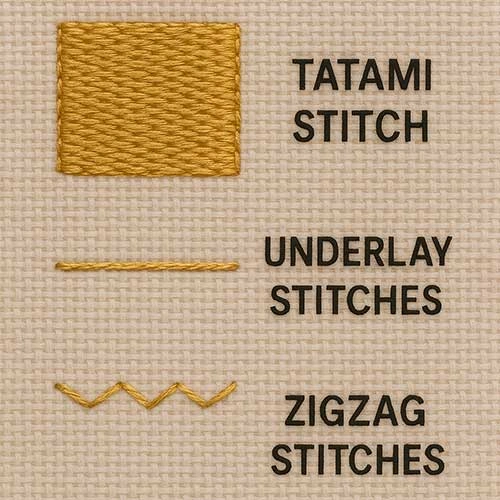
Tatami Stitch
The tatami stitch, also known as the fill stitch, is a staple in machine embroidery for covering large areas with a solid fill. Characterized by continuous parallel lines of stitching, the tatami stitch creates a smooth, even surface that is perfect for filling in backgrounds, shadows, or solid shapes within a design.
One of the key advantages of the tatami stitch is its ability to provide a soft, covered surface without adding excessive bulk to the fabric. This makes it ideal for creating detailed and textured designs without compromising the fabric’s integrity. The tatami stitch is often used in combination with other stitch types, such as satin stitches or running stitches, to add depth and dimension to embroidery designs.
When using the tatami stitch, it’s important to consider the stitch direction and density to achieve the desired effect. Adjusting these parameters can help create different textures and visual effects, enhancing the overall appearance of the design. Whether you’re filling in a large background area or adding intricate details, the tatami stitch is a versatile and essential tool in your embroidery repertoire.
Underlay Stitches
Underlay stitches form the foundation of a design and are placed beneath the primary embroidery stitches.
-
Key Features:
-
Provide structure and stability for intricate patterns.
-
Prevent puckering or distortion on delicate fabrics.
-
-
Best For:
High-quality embroidery that requires consistency and precision.
Zigzag Stitches
The zigzag stitch, also known as the zig zag stitch, adds versatility and flair to borders and edges.
-
Key Features:
-
Combines parallel straight stitches in a zigzag formation.
-
Offers decorative value while securing fabric edges.
-
Best For:
Edging designs or protecting corners prone to fraying.
Optimizing Stitch Length for Machine Embroidery
The Importance of Stitch Length
Stitch length plays a critical role in embroidery quality. Too short, and threads may cluster or break; too long, and the design may appear loose or uneven.
Key Considerations for Stitch Length:
-
Shorter stitches work well on smaller designs or sharp curves.
-
Longer stitches are ideal for straight, linear patterns or broader areas.
Tips for Adjusting Stitch Length
-
Match the length to the fabric type; lightweight fabrics may require tighter stitches, while thicker materials generally work well with longer stitches.
-
Always run a test design on scrap material before stitching on your final piece.
Selecting the Right Stitch Type for Your Project
The right stitch type depends on several factors, including fabric type, design complexity, and personal preference. Understanding the role of each stitch type is crucial for successful embroidery digitizing, ensuring that the final design is both visually appealing and structurally sound.
Key Factors to Consider
-
Fabric Compatibility: Some fabrics, like silk or chiffon, require gentler stitches such as underlay, while sturdier fabrics can handle dense satin stitches.
-
Design Needs: Decorative designs benefit from zigzag or bean stitches, while logos usually call for precision straight or running stitches.
-
Desired Aesthetic: Use fill stitches for texture or straight stitches for clean, professional logos.
Pro Tip: Experiment with sample fabrics to identify how the stitch behaves before committing to a project.
Combining Stitch Types for Creative Embroidery
Techniques for Combining Stitch Types
One of the most exciting aspects of machine embroidery is the ability to layer and blend stitch types to create unique effects. The embroidery needle plays a crucial role in executing these combinations, moving through the fabric to create intricate and layered designs.
Examples:
-
Combine fill stitches and running stitches to add shading and definition.
-
Use bean stitches for bold outlines and pair them with zigzag stitches for vibrant edgework.
-
Add depth by layering underlay stitches for structured designs.
Experimentation allows you to push boundaries and discover endless possibilities.
Bring Your Embroidery to Life
Mastering the art of machine embroidery stitch types requires a deep understanding of different stitches and their applications. With practice, you’ll find the perfect balance of structure, texture, and creativity in your designs. From basics like the running stitch to advanced techniques with underlay stitches, every stitch serves a purpose.
Explore, experiment, and enjoy the process as you refine your craft. Remember, every masterpiece starts with a single stitch!
Conclusion
In conclusion, machine embroidery stitch types are a crucial aspect of machine embroidery, and understanding them is essential for creating high-quality embroidery designs. By mastering the various stitch types, including satin stitches, running stitches, fill stitches, and tatami stitches, embroiderers can create a wide range of designs and achieve professional-looking results.
Whether you’re a beginner or an experienced embroiderer, understanding machine embroidery stitch types is key to unlocking your creative potential and producing stunning embroidery designs. Each stitch type offers unique benefits and applications, allowing you to tailor your approach to each project and achieve the best possible outcome. Explore, experiment, and enjoy the process as you refine your craft and bring your embroidery visions to life.
